
How to Play Battle for Greyport
The Red Dragon Inn: Battle for Greyport is a cooperative deckbuilding game that takes place in The Red Dragon Inn universe. You’ll play as one of the adventurers from our wildly successful tavern brawling game as you race through the city to save its various landmarks from monster attack. As you fight, you’ll recruit citizens to join your militia, and arm them with powerful items you scavenge for at each location. Each encounter brings you to a new location in the city, and closer to the final battle. Will you and your friends save the day (yet again) or will the city burn?
The game just launched on Kickstarter (here), but how exactly do you play this it? Glad you asked!
The objective of the game is to, of course, save the City of Greyport from some bad guys. Players do this by working together to defeat monsters across multiple battles taking place at different locations in the city. At each location they will have to fight new monsters and have the opportunity to add new heroes and items to their deck to hopefully increase their power to the point that they can take care of the big bad guy at the last battle.
The players can win in a variety of ways as defined by each scenario, such as by defeating a specific boss enemy or by saving the last location. The players can lose at any point in the game if one of the party members suffers a lethal amount of damage or in a variety of other creative ways the monsters have come up with.

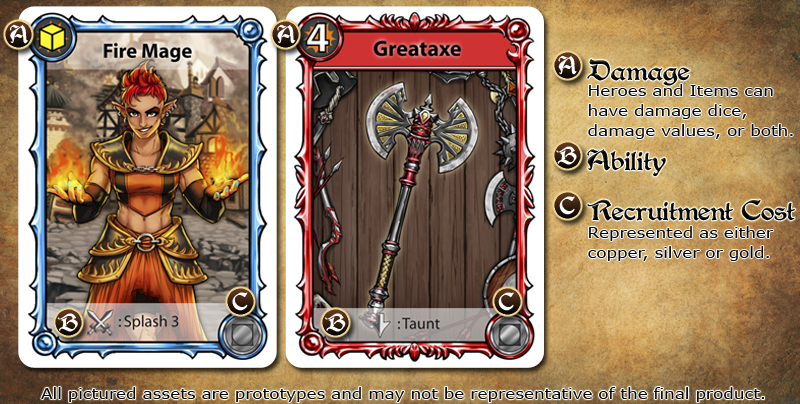
Players will be using Hero and Item cards throughout the game in their fight to defeat monsters. Hero and item cards have a variety of features, but the most important one is their color. Red Physical items may only be used by Physical heroes. In the same vein, blue Magic items can only be used by Magic heroes. Carefully managing the amount of magic and physical cards in your deck will be key to your victory.
To help you along, each player also has a special hero card that represents their Character. Character cards refresh each time their player draws a new hand at the end of their turn, ensuring that they can rely on their character to help out each time around the table. These character cards function exactly like hero cards but are never shuffled into their player’s deck.
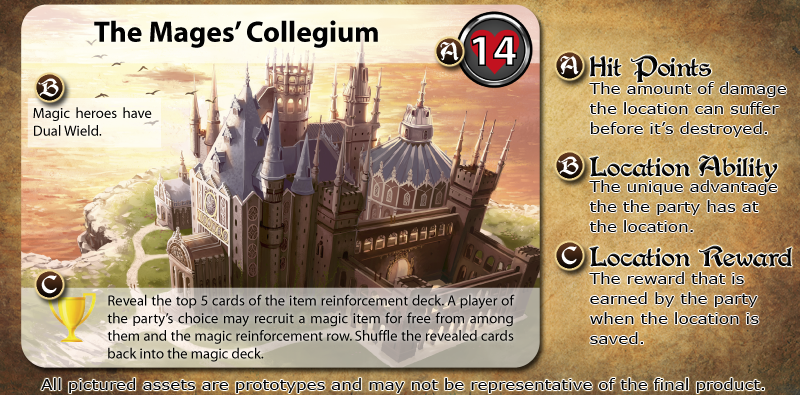
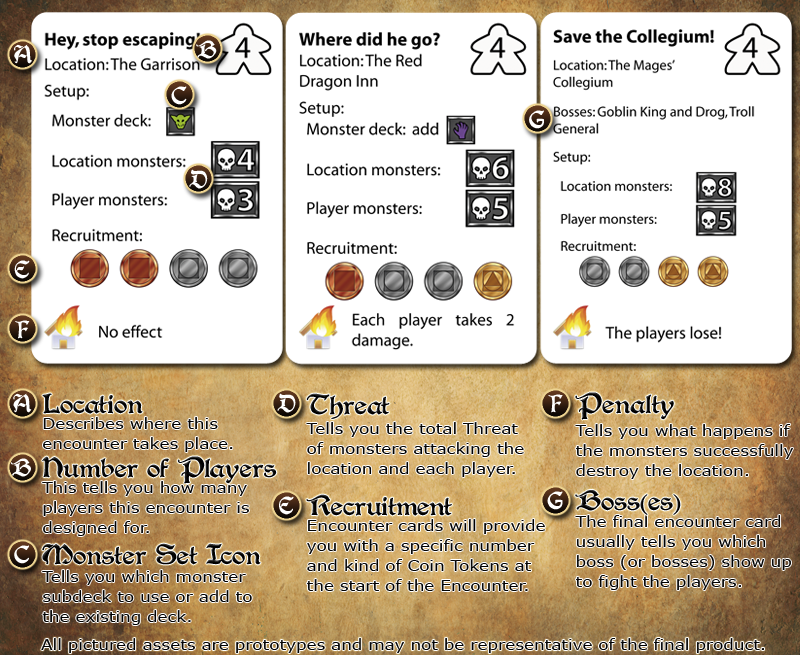
Location and Encounter cards define what sort of mischief the monsters are up to. Location cards have a defense value that determines how long it takes the monsters to destroy it and a reward for the players if they are able to save it. Furthermore, location cards frequently have an ability that helps aid the players in saving it.
Encounter cards (described later) define all of the bad stuff that’s happening to the location. It will tell the players how many monsters are attacking the location, how many are attacking each player, and what happens if the monsters destroy the location.
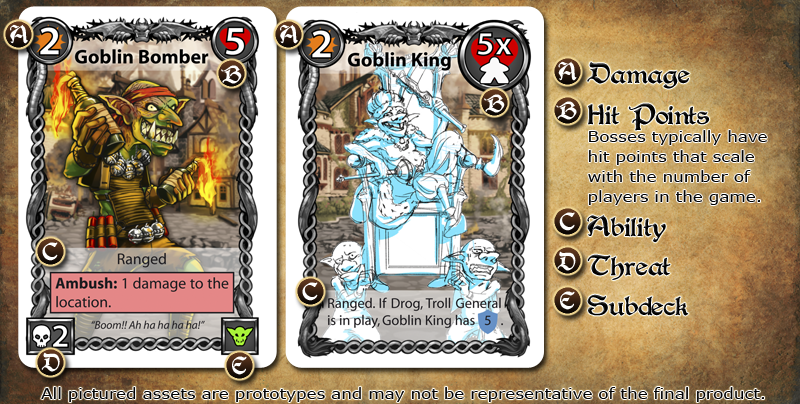
Monsters and Bosses have a bunch of information, all of which is bad for the players. These cards are fairly self-explanatory, and will primarily be there receiving and dishing out damage, though many of them can do other horrible things to the players – especially the bosses, they don’t play fair and are incredibly hard to kill!
For example, our good Goblin King may be a little squishy, but employs a massive bodyguard named Drog who keeps his liege well-protected with some massive damage reduction. You’ll probably need to defeat Drog before you can even get to the King.
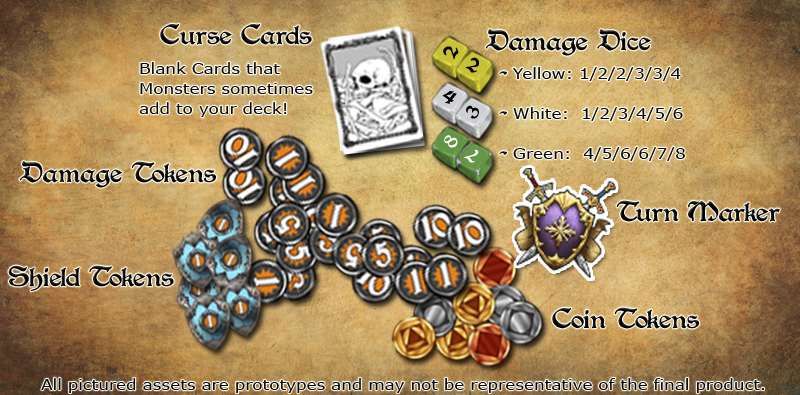
The rest of the game’s components are pretty straightforward:

At the start of the game, players will choose a Scenario of typically three battles. Each scenario defines which Monster Decks, Bosses, Locations and Encounters will be used.
Each player then chooses a Character, sets aside their character cards and shuffles their starting deck. A player is chosen to be the starting player and takes the Active Player Marker. Then each player draws a hand of 5 cards and adds their Level 1 Character Card to their hand.
Players start at the first Location and Encounter. These tell the players which Monster Deck to use, how many monster cards are put on the location and how many on each player. Typically this is represented by Threat Values on the encounter card. Monsters are played first to the location one at a time until their Combined Threat Value equals or exceeds the encounter card’s requirement. Then the same is done for each player.
After all Monsters have been dealt out, any Ambush effects on the monsters are resolved (usually all bad stuff that happens to the players or location). After the players have suffered all the ambush effects, the Active Player takes their first turn. Play then proceeds clockwise from there.
Bellow you’ll find a layout for a two player game.
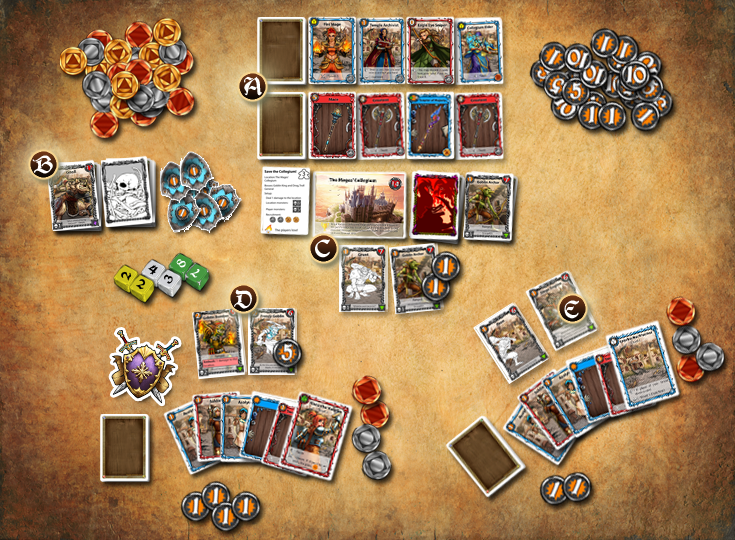
You already know what all the components are, so lets just breakdown the layout for you guys. We have two Reinforcement Rows at (A). Each row has a mix of physical and magic cards in it, but will only have either heroes or items to recruit. That way you will always have your choice between a hero, giving you more things to do each turn, or an item, significantly amplifying the power of your actions. Over on the left (B) we have the next monster deck that will get shuffled in after we defeat the first scenario. In the middle (C) we have the current scenario, location, monster deck and the monsters attacking the location. As you can see, one of the monsters already has some damage on it. Fiona is the active player (D) and has the active player marker as well as two of her own monsters. The monsters here can be fought. Deirdre (E) is not the active player, and her monsters may not be fought directly, but are also not in a position to deal damage to the location or a player this turn.

Each turn, the players will have an opportunity to fight the Active Monsters. The active monsters are the ones in front of the player whose turn it is. If there are no active monsters (i.e. no monsters in front of the active player) then players may fight Location Monsters, monsters attacking the location, directly.
Each player, in whatever order the party wishes, may play a single Hero (including their Character) during the active player’s turn. After a hero is played and any of its immediate abilities have resolved, further heroes may be played by other players, or Items may be equipped to a player’s own heroes.
The active player may also, at any time, use their active player marker to Taunt a monster and move it over to themselves. The taunted monster can be one on the location, or in front of another player. Usually this ability is used to peel monsters off the location, but sometimes it’s used to take the pressure off of another player who’s already suffered a lot of damage.
At any time, a played hero can then be assigned to Fight. That hero’s owner declares which active monster that hero fights for the turn. That hero’s owner rolls Damage Dice equal to the combined dice represented on that hero and any of their equipped items. The result of the damage roll is then applied to the fought monster. If the monster isn’t killed outright by the damage roll, then Damage Tokens are used to mark how much damage that monster has suffered. Any excess damage is lost.
If the last monster attacking the location is killed or moved away from the location, the players immediately benefit from the Reward for saving the location.
There are many ways for the players to cheat all of the rules, of course. Some heroes and items are allowed to fight whomever they please, while others deal a flat amount of damage. Still others can launch powerful splash attacks that deal damage to a whole group of monsters, or summon more heroes to fight on the same turn. Taking advantage of all of the abilities provided by your heroes and items will be key to victory!
For Example:
In a three player game Fiona is the Active Player and has three monsters in front of her.
Zot plays a Temple Archivist first and resolves the Archivist’s instant ability: “Draw a card, then you may retire a card from your hand.” Unfortunately, Zot doesn’t have any Item Cards.
Fiona plays Fleck the Bard and resolves Fleck’s instant ability: “Each player draws 2 cards, then discards a card.”
Gerki plays a Clergyman and resolves the Clergyman’s instant ability: “A player of your choice draws a card.” and chooses Zot.
Zot thanks his allies for the two items he just drew, and equips them to his Temple Archivist (who has the Dual Wield ability): a Scepter of Majesty and a Freezing Staff. He then has his Temple Archivist throw a whole pile of damage at Fiona’s biggest monster, easily dispatching of it in a shower of arcane fury! The party cheers!
Fiona then equips Fleck with another Freezing Staff and has him fight one of the remaining monsters in front of her, leaving it at two hit points.
Gerki doesn’t equip his Clergyman with anything, complaining about how it would be a waste of an item, and has his Clergyman attack the monster with only two hit points left… and rolls a one, leaving the monster there with a single hit point.
The rest of the party groans and moves on to the Monster Damage Step with Fiona staring down two very much still alive monsters in front of her.

After all players have had an opportunity to play heroes and declare fights, the Active Monsters and Location Monsters attack! This damage is often pretty considerable, so using abilities to prevent the damage, as well as carefully moving monsters around are going to be important things to consider throughout your turn.
As an added wrinkle, many of the more powerful monsters also have special abilities that make things even worse for the players they damage. These monsters are always worth considering when you are prioritizing targets!
When the monsters deal damage, they first deal damage to the active player. As long as no player is eliminated, the monsters on the location then deal their damage. If the location survives, the turn continues as normal. If the location suffers lethal damage, then the Penalty is suffered, then, starting with the active player and proceeding clockwise, players choose Location Monsters to move in front of them one at a time until there are no more Location Monsters.
Any unused Shield Tokens are lost.

After all monsters have dealt their damage, players enter the Cleanup Phase. During this brief phase, some abilities on heroes, items or monsters may trigger. After that, all played cards go to their owner’s discard pile.
Some cards cause you to Retire itself or another card, which means removing it from the game. Don’t worry! Your special character can never be retired, however they can lose power. If you would have to retire your character, you instead level them down. If they are already level 1, then you don’t need to worry about it!

After all of the fights happen and monster damage is dished out, you’ll have the opportunity to Recruit a new card. In the middle of the table there are two Recruitment Rows. One row is comprised of only hero cards and the other of only item cards, but both decks are mixed between physical and magic cards. Players will only be able to recruit from the available heroes and items. Sometimes Zot will get lucky and be able to get a Scepter of Majesty and start dishing out massive magic damage. Other times the only available heroes and items will be physical, and he’ll need to choose ones that can still synergize with his deck.
The active player must recruit a card by discarding a Recruitment Token of equal or greater value. The recruited card is added directly to their hand and is available for use the next turn.

After the active player has recruited a card, they may then discard any cards from their hand they do not wish to keep before drawing up to a new hand of 5 cards (or discard down to a hand of 5 cards if they have more than 5 cards). Then they return their character back to their hand to make a final hand of 6 cards. A player’s character never counts against their hand size and players may have more than 5 cards in their hand between turns (if, for example, they somehow draw extra cards).
Finally, the active player passes the active player marker to the left, starting a new round!

Once all of the monsters at a location are defeated, the encounter ends (regardless of whether or not the location was saved). As the players make progress (either by saving the location or surviving a battle), they will gain access to more powerful heroes and items and increase the power of their character card. However, the monsters will also become more numerous, more powerful, or both!
If it was not the last encounter of the scenario, players move on to the next location, deploy new monsters, and continue the fight!
And that’s everything you need to know! The print and play rules are available here and the print and play will be available on Board Game Geek soon. If you enjoy the game, you can check it out on Kickstarter where we are hoping to unlock it with tons more content including additional locations and monster decks to add even more variety to the fights!

